Friday, May 18, 2012

Foamy Finger Paint


it in about a tablespoon of water before adding it to the foamy mixture. This added great color and didn’t leave a trace in the tub.
Foamy Finger Paint
What you need:
1 bar ivory soap
½ cup water, soap dye, or food coloring
Mixing bowl
Whisk
Small dishes for separating colors


Grate the soap into the bowl and add the water. Whisk  until it is the texture of shaving cream, about 2 minutes. The longer you mix the smoother the final paint will be.

If you want to make more than one color you need to separate the soap into several dishes at this point.
Whisk
Add a few drops of your choice of coloring agent to each container and mix well. For something a little different, mix the color only half way to give a marbling effect.

We set out sheets of freezer paper and let the kiddos go at it. When they had painted their little hearts out, clean-up was a cinch, we just had an early bath time. And the best part, they were already pre-soaped.

My teenagers had a great time with this project as well. They discovered that if they painted something then scraped the extra foam off the paper had a rainbowed marble effect which they could then paint something on top.

In addition, we need to give huge props to Ivory soap for really being able to get things clean. We found when color mixing that yellow and blue made green, pink and yellow made orange, but when you mixed all three together for long enough, it turned white again.

The first time we made this paint we wanted to use it as a bath tub paint but were hesitant about using food dye on the tub grout. Instead we took a Crayola tub tint and completely dissolved it in about a tablespoon of water then added it to the foam. This worked wonders.

If you manage to have any foam left over it stores wonderful in any airtight container. And on a final note, although it looks like yummy, sweet, and sugary cotton candy. My little ones tell me it doesn't taste so hot.

Enjoy! 
We set out sheets of freezer paper in the hallway and let the kids go at it. When the little ones are done painting
*
 is a cinch, just take the party to the tub, they’re already pre-soaped.
Grate the

Saturday, May 5, 2012

Paintsicles


I am always in the market for new and fun ways to entertain my little ones, even better if they are mess free! I came across this little idea a few weeks back and am finally happy that we got to give it a try.   
Here is what you’ll need:

·         Popsicle tray
·         Finger or liquid tempera paint
·         Water
·         Stir sticks to mix with
·         A freeze
·         A whole lot of patience

This is simple as simple can be! Add about a tablespoon of paint to the bottom of each of your popsicle cavities. Use a different color in each one. Fill to the top with water and mix well.


Insert the handles of the popsicles and place in the freezer overnight. Our popsicle tray came with different colored handles so we matched the paint colors that we used to the color of the handle. This was especially important for our littlest one so he could see what color he was getting without having to take them all out.


When you’re ready to paint run warm water on the outside of the popsicle tray until each paintsicle pops out easily. The tray makes a handy spot to place them as well.

Right in the beginning we found the colors weren’t nearly as vibrant as we wanted but as they started warming up and melting the colors really started to pop.

This would be a great activity for a Crayola themed birthday party. Make several sets the night before, lay out large paper table clothes and let your little artists go at it.

Sunday, April 15, 2012

Rainbow noodles


I am always interested in trying out new meals for the kids. With two toddlers and two teens it isn’t always easy to find something everyone will enjoy. The little ones eat just about anything, which is a blessing in its own, but the older two are rather picky when it comes to what goes in their tummies. For the most part the older ones don’t eat any veggies at all. Actually, the oldest only eats broccoli and the second oldest, well let’s just say he would rather drink a gallon of spoiled milk, upside down in the rain than have any sort of fruit or veggie cross his path.
Lately my favorite companion in the kitchen has been food coloring. A drop in the mashed potatoes or in the pancake mix can do wonders on whether or not I can get all four kids to eat.  The little ones don’t get bored and it makes dinner time exciting for everyone.
A few weeks ago I was scouring Pinterest and came across something so simple I couldn’t even fathom how I didn’t think of it first.
Rainbow noodles.
Not like spinach and tomato juice dyed noodles, literally rainbow noodles.
And it is so simple! All you have to do is add a few drops of food coloring to the water before it starts boiling. For a large pot I did 10 drops of blue in one pot and 10 drops of red in a separate pot. I would have had two more pots going as well but my mom was occupying them with her homemade mozzarella at the time.
 
 
While the noodles were boiling I tossed some frozen chicken tenders, lightly salted, into a 375 degree oven for about 30 minutes. They cooked up nice and golden making a great contrast against the colorful noodles. For the little ones and the adults I also added green peas, then everything was topped with my Mom’s mozzarella.

Friday, April 13, 2012

Piggy Noses


Looking for a last minute party favor for you Barn Yard themed party?
Perhaps just a fun rainy day activity to do with the little ones?
I don’t remember where I came across these for the first time but fell in love with them from the start.


Best of all you can make these little suckers with stuff that you have around the house. All you need is:
·         Empty toilet paper or paper towel rolls
·         Craft knife or scissors
·         2 inch pink circles
·         Strips of pink paper about 1.5 inches by 6 inches
·         Rubber bands
·         Ruler
·         Glue stick
·         Elastic tie or string


Cut mini tubes out of the toilet paper tubes by measuring down about 1.5 inches. I used a rubber band to mark off the distance and cut them using the craft knife.

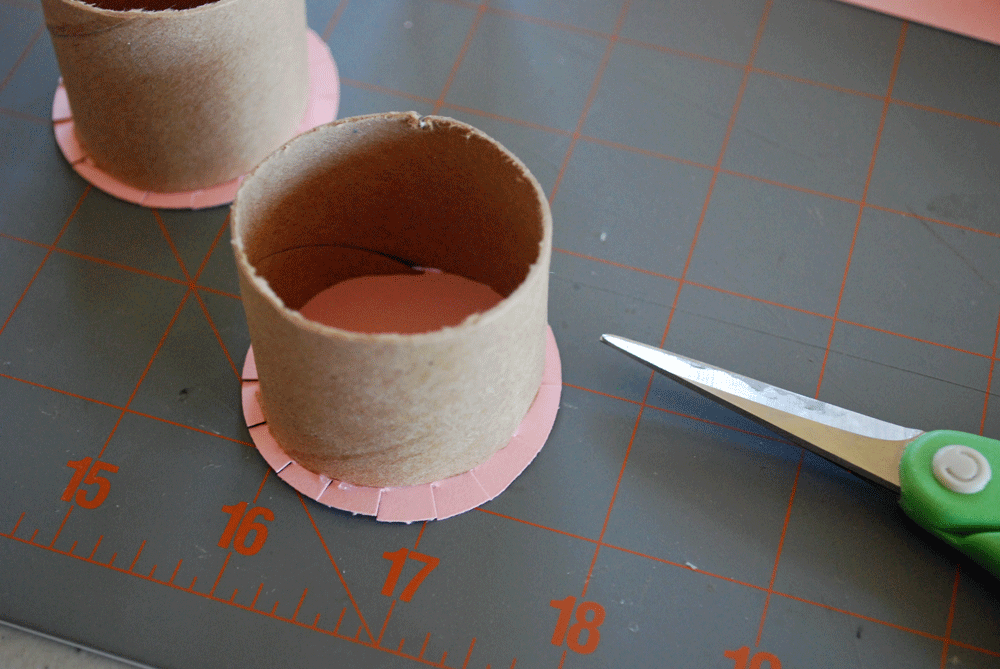
Add a little glue to the rim of one end of a tube and center the 2 inch circle. Let these dry for a few seconds. I prefer to use a quick dry glue because my toddlers get very antsy when they know there are piggy noses in the making.

Cut little about 20 little snips evenly spaced around the edge of the pink circle making sure they touch the tube on the inside. Run a little bit of glue around right at the bottom of the tube and fold up the little tabs that you just made around the pink circle, pinching them down tightly to make sure they adhere well to the glue.

Attach your rubber bands around the freshly glued part and let dry. I use this time to draw the nostrils on the front of the pink circle. I like to use different colors so each kid knows which piggy nose is there’s.

Remove the rubber bands. Take the strips of paper and evenly cover the backside with a thin layer of glue. Starting at the bottom of the piggy nose (if you’ve already drawn your nostrils on you will be able to tell the bottom by which way the nostrils are facing otherwise it doesn’t really matter where you start) adhere the pink stripe to the nose making sure you line up the edge of the strip with the top of the tube. You will be covering the tabs that you glue down in the step before. Replace the rubber bands and let dry.
After the glue is completely dry poke two holes at the sides of the nose to attach your elastic. Make sure you measure around your future piggy’s head first because nothing is worse than an overly tight piggy nose.  Tie the elastic tightly to the nose in a loop, attach to your piggy, and sit back and enjoy your hard work in action.
You don’t have to constrict yourself to just piggy noses. These make all sorts of great noses just by using different colors. Try leaving the tubes longer to create zebra and horse noses. Draw on different shapes to create kitty, lion, and bunny noses. You can even add whiskers if you’re feeling really crafty.
Enjoy and don’t forget to KEEP LIFE SWEET!
-Chelsea

Wednesday, April 11, 2012

Our doors are opened! Check out www.yourlittlecupcake.com for the latest and greatest as well as website exclusive products.

Did you know that Your Little Cupcake is branching out? That's right, we are opening our own website! www.yourlittlecupcake.com ! Don't worry, you can still find all of our great products in our Etsy shop as well. Stay tuned for more information and our grand opening date.

Monday, March 19, 2012

Did you know Independence Day is only 107 days away? Yeah, I know I've started a mighty countdown but it is one of my favorite holidays. Want to be entered to win a free set of Independence Day cupcake wrappers and toppers?
Go to my facebook page, Your Little Cupcake, and leave a comment on the post about this giveaway.
Leave a comment on the post and you will be automatically entered to win. Don't forget you need to be a fan of the page to comment.